The Scirra development team has been hard at work during the past several Beta releases of Construct 3. Adding in many improvements to the 8 Directional Movement Behavior, Effect System, and Timeline Editor, among other additions. Along with the Timeline Editor improvements, they have also began a beta channel release of their new application, “Construct Animate”. You may have seen me mention Construct Animate in a previous blog post. It takes the Timeline Editor from Construct 3 and builds upon it, creating an entirely separate application. It allows anyone to export their animations created within the application to either an Image Sequence, Video, or HTML5 Project.
The major changes in this Stable release of version r302, are mainly the ongoing improvements having already been mentioned. Those surrounding the Timeline Editor, Effect System, 8 Directional Movement Behavior, as well as some other Quality of Life(QoL) changes as well. Those are the sometimes simple changes to an application which make it easier and faster to work within, for any project. Most notable are the improvements to the Debugger, Movement Behaviors, Effect System, and now having the ability to associate .c3p files with Construct 3 when it is installed as an application through either Chrome based browsers, or Microsoft Edge.
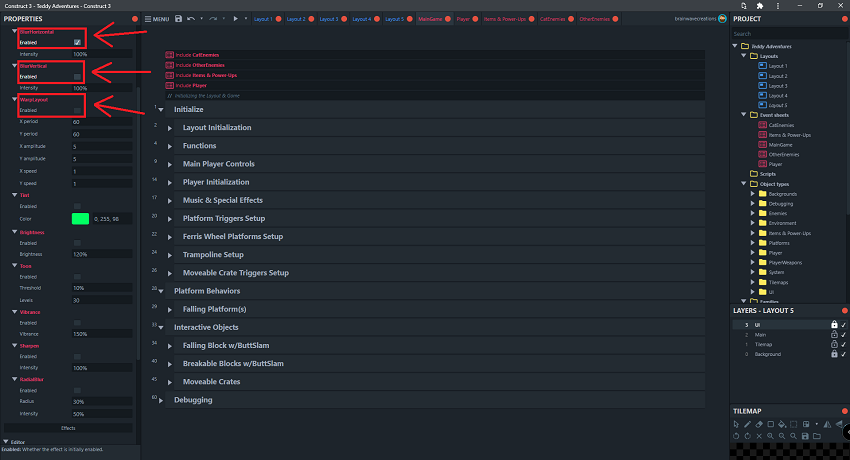
As far as the Effect System goes. There is a new check box for the effects added to an entire layout, layer, and/or objects within your layouts. This simple check box allows you to enable/disable the effect(s) from beginning straight away when the layout loading is completed, or when the object an effect has been added to is created. For myself, this is a huge improvement for working within Construct 3. Inside my current project, I have a list of 9 Effects added to the Layouts. Previously, I needed to have a list of 9 Actions within my Initialization Section to disable each effect when each layout is loaded. Then call each effect to become enabled, when it is required. Now, I can simply uncheck the “Enabled” checkbox within the property window for the Effects, and have them automatically disable during the application/layout loading process. Then simply have an Event to enable each Effect as they are needed within my Event Sheets.
Along with this addition, Scirra has added auto name completion for the Effects. If you have worked with Construct 3, you’ve likely noticed this for Object Names, Variables, etc. When adding an Action that will affect something within your project whether it be a variable, object, or what have you, the text box will often autocomplete with whichever object name or variable you begin typing out. Now, the same thing applies to the Effect System. So rather than having to take note of the exact spelling for each special effect you’d like to use in your project. To make sure that your spelling is exactly on point, and precise. All it takes is one character to be the wrong case(upper or lower), or the spelling to be off a smidge, and the proper effect will not be called within an Event Sheet’s Action. Now, all you need to do, is type the opening quotation marks. Then, begin typing the name of an effect you would like to call within your project, and Construct 3 will automatically begin completing the text field with any effect name that matches what you are currently typing. This simple tweak/change to the application, makes using the effects a breeze, and really speeds up the development process. If you are using many special effects for various purposes, I’m sure it will make things faster for you as well.
The addition of associating .c3p files with Construct 3, while it is installed as an application through either Chrome, or Edge web browsers. Makes things a bit simpler as well. I don’t know about you, but I like to keep Construct 3 installed locally on my Desktop. And, I do so through the Chrome web browser. Now, all I need to do to open any project is double click the .c3p file from within my computer’s File Explorer, and it will open right up within Construct 3. Please note, if it is your first time attempting this, a dialog box in Windows will open up and ask you which application to associate .c3p files to. Simply choose Construct 3, or Construct 3 beta(whichever you have installed locally), then check the box for the option to “Always Remember This Choice”. At least I believe that is the wording the dialog box uses. This will remember your choice of Construct 3. Then, anytime in the future when you load a project file this way, it will automatically load up Construct 3 followed by your .c3p project file 🙂
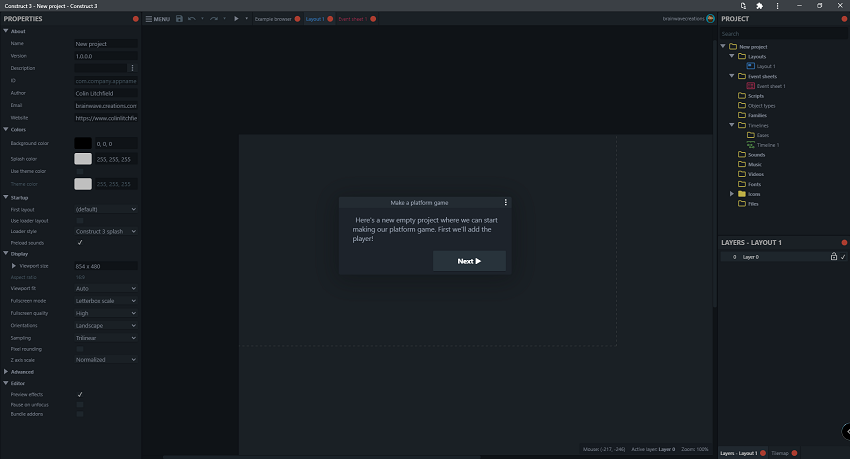
Along with all of these additions and improvements, there’s just a couple more things I would like to add here. When loading Construct 3 there is a new “Make a platform game” guided tour, which will load by default for any new users loading the application for the first time. This guided tour will walk you through step by step, on how to create your first basic platforming game within Construct 3. The debugger has had a couple improvements as well. There is a new checkbox labelled “Hide unused” on the Inspector tab, which will hide any objects that are not currently being used on the currently loaded layout you are debugging. Along with this, there is a search box in the bottom left corner of the Inspector tab within the debugger as well. Type whatever object name you would like to dig into deeper for debugging purposes, and it will quickly load the object you are looking for within the Inspector’s System list of all objects within the layout. One last addition to mention, then I will let you go XD. Creating objects within a “hierarchy” will now also pick the created children within the hierarchy, which makes working with Parent/Child objects a bit easier as well.
You can read about all these changes, bug fixes, and more, at the official Construct 3 r302 blog post, located here: https://www.construct.net/en/
There is also an official video on there YouTube channel here(Also embedded below): https://www.youtube.com/
